Preparing and Delivering Technical Presentations
Samir G. Khoury, Ph.D., P.G.
|
1.0 Course Outline This course takes you step by step through the process of preparing and delivering a clear and lucid technical presentation at scientific and professional meetings. The guidance provided is also applicable to the preparation and delivery of less formal presentations, such as those given in the form of internal company reports to corporate executives or as lectures prepared and delivered by professors or graduate students at colleges and universities. The course starts by suggesting that you write answers to ten fundamental questions. Your answers to these questions will guide you through the preparation of the first draft of your presentation. The course then progresses by providing you with specific suggestions that will assist you through the preparation of the introductory section, the body and the conclusion section of your presentation. The preparation
phase of your talk will take you step by step through the recommended
rehearsal sessions that will help you practice your delivery skills.
In that section of the course you will also learn that speakers have
limited time to communicate their message in a clear and concise fashion.
Indeed, your job during the delivery of your presentation is to scan
and pay attention to your audience in order to adjust your talk and
be able to transfer your knowledge effectively. In preparing for the
event, you are also prompted to anticipate and prepare for unforeseen
circumstances that may arise so you can handle them with ease when they
occur. By familiarizing yourself with the content of your presentation
and rehearsing repeatedly ahead of time you will most definitely improve
your performance when you finally deliver your talk. 2.0 Learning Objective This course is aimed at those persons who are not skilled presenters and are uncomfortable in unfamiliar situations. It will also help those that are di organized and whose presentations tend to lack focus. It will also assist the persons who have a monotonous presentation style, do not adjust well to their audiences and are unprepared to answer hard questions, may be nervous, or are even scared to speak in public. In this course you will learn:
When you
follow the simple suggestions presented in this course, your presentation
will achieve its ultimate goal of connecting you with your audience,
holding their attention throughout and helping them remember your message
long after your presentation is over. Although this course addresses the techniques for giving an oral presentation at scientific and professional meetings, the material is equally applicable to the preparation of less formal presentations given to smaller groups. Whether giving a presentation to a large audience or speaking to a smaller group, it is important to realize that the key to success is to plan carefully for the event well ahead of time. When the day finally comes you should feel well prepared and confident of being able to give a memorable performance. It goes without say that careful prior planning and diligent rehearsing for the event will always improve your final presentation. Attentive and persistent preparation and rehearsal is the key to success. Many presenters of technical information usually believe from the onset that their material is downright too complicated, uninspiring and lacks general interest. This perception is reinforced by some companies that tend to perpetuate this myth when they impose a rigid structure on how the material is presented by their staff at public meetings. For example, some companies require their staff to stand behind the lectern and adhere to the written message during the entire duration of the lecture. As will be explained in this course, however, there are new horizons that open up for those who are willing to depart from this rigid model in order to make their presentations enjoyable and a positive learning experience for their audience.
Giving an effective presentation requires careful planning and a lot of practice well before the talk is given. As a starting point, I will assume that the research or investigation that you are presenting has been completed and that you intend, or have been asked, to communicate your findings at a major technical meeting. In order to prepare a lively and engaging presentation you should begin by assembling and reviewing your material and consolidating what you will be covering in order to come up with the few well-chosen conclusions you want to impart. Begin by asking yourself what you aspire to accomplish at the end of your presentation and then write down your answers to the following set of questions:
Once you have answered these questions, you should have identified the major parts of the talk you plan to give, and the ideas you intend to communicate. This is basically the framework of your presentation. If you cannot formulate your thoughts in a set of simple and clear statements, then that is a sure sign that the content of your presentation is deficient and needs to be re-formulated.
Keep in
mind that your main objective is to gain the attention of your audience.
Think about the type of introduction that you will use in order to rivet
their attention. Explain why you think the topic you are presenting
is important to them and introduce the core of your message. You can
use a story, a fact, a comparison, an example, a quote, an illustration,
a cartoon or other appropriate analogy. Use a different approach to
illustrate each point you will make in order to reach as many people
in your audience as possible. Remember also that writing differs from
speaking. Writing and speaking are not totally unrelated skills, but
are very different skills that need to be mastered independently. The
following figure contrasts the distinction between information presented
in a written document and during an oral presentation. Figure
1: Distinction between information presented in a written document and
during an oral presentation After writing down the first draft of your presentation, you should review it and pay special attention to how the words will sound when they are spoken. Reading the written words is not an acceptable substitute, and should not be considered as an option. You can start by recording what you have written and practice listening to the tape to make the necessary adjustments. There are no extra spaces or silence in the written record. On the other hand, pauses for breathing and rest are an integral part of imparting a verbal message. Do not hesitate to have someone else read your presentation back to you so you can hear how it sounds. Do not give a presentation you have not heard how it sounds. Your goal should be to maximize the rate of information transfer to your audience. Organizing your presentation into three separate sections helps you accomplish this goal. The three sections are:
5.1 The Introduction Section In your introduction you should present the subject matter that will be covered in your talk. This is the place to state the problem or reason for performing your research or investigation in the first place. It is important for your audience to have a clear idea of why the work was undertaken. This is akin to setting the stage for what will follow. Another function of the introduction is to give a preview of the presentation itself. Topics such as the scope and milestones should be outlined here. In a sense, the speaker is providing his audience with signposts to enable the listeners to anticipate the upcoming flow of information. Acknowledgements to helpful personnel, organizations, and funding agencies, are appropriate to include in this part of your presentation. Doing so at this point will allow you to reserve your conclusion for making a strong and memorable statement about the results of your work. 5.2 The Body of the Presentation To start with, you can safely assume that your audience is only familiar with the title of your talk. Beyond this minimal assumption, the rest of your talk is all yours to bring to life. Do not hesitate to repeat the major subject of your talk within the body of your presentation, even if you already alluded to it in your introduction. Familiarity, in this context, leads to understanding. Remember also that the body of your talk ought to follow the course you laid out in your introduction. If you deviate significantly from that path, you will confuse your audience. Any discussion of method used and data collected belongs to this section of the talk and should be directly related and relevant to your final conclusions. You may have bits and pieces of information that you consider interesting and wish to impart but remember that these are non-essential and distracting elements. You should always present your methods and data simply, clearly and in sufficient detail to support your concluding statements. Clear statements delivered in a conversational tone and at a reasonable clip are the essential ingredients of good communication. Keep in mind that the audience cannot refer back to your earlier statements. So, if need be remind your listeners every now and then of the important points they have just heard. Do not force your audience to follow the development of your thoughts without a clear idea of where you are going. 5.3 The Conclusion Section In most cases you will find out that the audience is more interested in your conclusions than in any other segment of your presentation. If you structured the presentation of your methods and procedures to lead you smoothly to your conclusions then your audience would have been led through a coherent and understandable path that has been easy to follow. Remember also that you are doing yourself and your audience a favor by limiting the number of your conclusions. In this respect, quality and not quantity should be the guiding principle. Few well-documented conclusions will make a greater and lasting impact on your listeners. A well-crafted summary hopefully repeating and paraphrasing what you already said for the third time will nicely round off your presentation. The conclusion section of your talk is akin to the cool-down segment of a strenuous and well-balanced physical exercise program. Your object is to ensure that your audience will remember the few points that you made and will retain them for a long time after hearing your presentation. 5.4 General Guidance For general
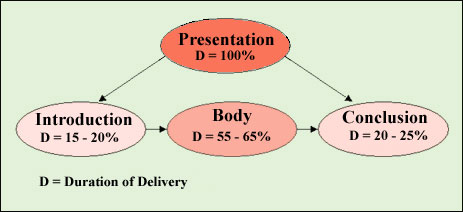
guidance, and as shown on the following figure, your introduction should
consume no more than 15 to 20% of the total allocated time for your
presentation. The central body of your presentation should consume about
55 to 65% of your total allocated time. Finally, your concluding section
should consume the remaining 20 to 25% of your total allocated time.
Figure
2: Recommended breakdown of the total allocated time for your presentation
For example, assuming that you have a total allocated time of 30 minutes for your presentation, you should spend about 5 to 6 minutes on the introduction. You should then take 17 to 20 minutes to deliver the main body of your presentation, and take about 6 to 8 minutes to wrap-up and re-convey your most important conclusions. By following these guidelines you will either finish a couple of minutes before or a couple of minutes after the expiration of your allocated time.
Whether you are a beginner, building your presentation skills, or are already a seasoned presenter, rehearsing is very helpful and will most definitely improve your performance. To get ready, you should practice by yourself first mentally then in front of a mirror, and later on in front of someone else, or a smaller group, who can give you some feed back. You should focus and pay special attention to the time you spend on every major point you make. Go into sufficient detail to make your points but avoid the tendency to give too many minute specifics. Remember that practice is also valuable to help you conform to your time limit. You want your main points to be comfortably placed within the body of your talk and not be given as an afterthought close to the end of your presentation. You can
read from your manuscript or notes only during your first few rehearsals.
Your object is to wean yourself from this crutch as soon as possible
because reading word for word from a manuscript is one of the best ways
to put your audience to sleep. If you watch good speakers you will note
that, as a general rule, they do not rely on written material or prepared
notes. Below is a picture of Queen Elizabeth II delivering a speech
during her state visit to the US, on the occasion of the 400th anniversary
celebration of the James Town settlement in the New World. As you can
see, she is not relying on a written script to give her presentation
and is therefore free to concentrate on establishing eye contact and
personal rapport with her audience. Figure 3: Queen Elizabeth II delivering a speech at a dinner on the final day of her state visit to America (based on a picture published in the popular press)Usually the delivery of experienced speakers is keyed to and guided by the visual aids they use as an integral part of their presentation. In other words, the slide on the screen is not only used to help the audience understand the subject matter, but it is also used by you as a prompt to help you keep your talk moving at a comfortable pace. Try also to pay attention to the volume and tone of your voice and use your hands, body and facial expression as needed to emphasize and complement the points you are making. Use pauses to your advantage in order to drive a point, or to underscore it by repetition. Be careful not to repeat the same words too many times. Speakers have a limited time to communicate their ideas clearly and in a direct fashion. Your goal should be rapid comprehension by your audience. To accomplish this desirable outcome you should aim to be relaxed and totally natural. You should rehearse repeatedly up to the point when you can deliver your speech with only occasional glances at your notes. Achieving this level of proficiency will enable you to scan and pay attention to your audience in order to adjust your talk for optimal effectiveness as you go. Finally, if you have prior access to the designated room or auditorium where you will be giving your talk, it is always a good idea, and quite helpful, to have a final dress rehearsal in the actual setting of the event. As you practice, think of yourself as the central character in a classical play rehearsing for your opening gala performance in front of an appreciative audience. You have surely admired on more than one occasion the flawless delivery of an actor or actress in a play you particularly appreciated. These actors were able to attain their highest level of excellence thanks to their assiduous efforts in repeated rehearsals to polish and perfect their performance.
It is difficult to anticipate all that can go wrong during a presentation. However, it is quite feasible to plan in advance and take reasonable precautionary measures to help you avoid embarrassing situations and keep you relaxed during your talk. Following are some helpful suggestions:
Guidelines for the preparation of clear and legible visual aids are given for your use in an Appendix at the end of this course.
All of your preparations will pay-off at the time you are introduced to give your presentation. All of the directions that you followed by using the pointers given in the earlier parts of this course will bear fruit at this point. 8.1 Stage Presence Be aware that as you move to the podium, all eyes are fixed on you. The impression you project at the onset is crucial and will carry you a long way through your presentation. Keep in mind that your listeners will note your general appearance, poise, how relaxed you are and will use these cues to decide how well you are able to communicate. These impressions will also affect their judgement of your technical expertise. You may think that these aspects may not be relevant to your message, but they reflect on you, the carrier of the message. All this, of course, is quite reminiscent of the tale of the Turkish astronomer recounted in "The Little Prince" a book written by the French author "Antoine de Saint-Exupery". The writer describes the adventure of the discovery of asteroid B-612 that was presented at an international conference by a Turkish astronomer. The first time around, nobody paid attention or believed the speaker because of the national garb he was wearing. A few years later, when the same astronomer repeated his presentation at another congress, but this time wearing a very elegant suit, everybody applauded and accepted his discovery with great enthusiasm. The author concludes, rather cynically, that this is the way grownups act. Remember also that during the duration of your talk your audience will continue to evaluate you on an ongoing basis. Do you seem to be in control of the situation, or are you hesitant and unsure about how to proceed? If the impression you give is one of uncertainty, your audience will become restless. For most adults, speaking in front of a large audience is a very frightful experience. But in actual fact, most of the things that a presenter imagines may happen during the talk do not actually materialize. For example, you will not faint or freeze and be unable to deliver your presentation. It is OK to feel anxious and you should work at calming yourself down. If your throat is dry, drink some water and take a deep breath. To boost your assurance level look at friendly faces in your audience, and avoid looking at frowners or hostile faces. As mentioned earlier, careful preparation and repeated rehearsals will build your confidence level. When you are in good control of your technical material, you can then concentrate on the mechanics of the presentation itself. Finally, the importance of visiting the meeting room in advance of your talk becomes apparent at this point. This seemingly simple procedure is recommended to enable you to familiarize yourself with the actual setting in which you will be delivering your message. 8.2 Audience Awareness Take some time before the meeting to consider what you know about the people who are likely to attend your talk. How much technical training do they have in your subject? Are you dealing with people that have only a general knowledge in your area of expertise? Do you think they will consider your material conventional or controversial? Answers to these questions will help you establish a common affinity with them. As you give your presentation, remember that your listeners expect you to establish eye contact with them. Eye contact brings the listeners into your presentation and helps you establish rapport. Do not stare at one person only but, distribute your gaze around the room and pause momentarily on specific individuals to let them know you are aware of their presence. You can practice this skill by giving your presentation in front of a smaller group that has been asked to raise their hands at the beginning of your talk. Every time you establish eye contact with a member of your audience, that person is allowed to lower his/her hand. Ideally, by the time you end your presentation, all hands should have been lowered down. You will find it useful to begin your presentation without using visual aids. Leave the lights on and try to establish an immediate relationship with your audience. The introductory section of your talk is well suited for this type of interaction. Once this is done, you can then proceed with confidence to dimming the lights and using your visual aids. As you continue to give your talk vary the pitch of your voice in order to maintain audience interest. Unfortunately, too many speakers deliver their talk in a monotonous voice. Monotonous is synonymous to boring. If you are monotonous, your audience is likely to conclude that you have little interest and no enthusiasm for the subject of your delivery. Also, it is important that you pay attention to the reactions expressed by your audience: smiles, frowns, nodding heads, shaking heads, people shifting in their seats are all meaningful non-verbal indicators of how well you are communicating. Based on these non-verbal clues you should be able to adjust your delivery accordingly in order to convey your message efficiently. If you use a microphone, remember that the speaker system adds a new dimension to your voice. Changes in voice pitch may sound artificial or contrived when they are amplified by a sound system. One way to overcome this problem is to practice with a microphone. Keep in mind that variety is produced in your speech by changes in both pitch and loudness. Increased volume is an effective way to emphasize an important point, but sound systems tend to over emphasize volume at the expense of pitch. To compensate, you will tend to retain a neutral voice in order to maintain the volume at a constant and comfortable level. This will throw you back to the monotonous conundrum. Again, practicing with a speaker system will help you overcome this form of communication handicap. It goes without say that you must be understood before communication can occur. Listen to yourself as your talk proceeds and consciously try to enunciate clearly. Pauses are natural and don't feel that you need to fill in the pause with filler sounds, silence is perfectly acceptable. On the other hand, unnaturally long pauses will make an audience nervous, which will impact on the effectiveness of your delivery. Do not keep any single slide up for much more than 30 seconds to a minute at a time, and do not read the information shown on your slides to the audience, because it is very boring. Use key words or bullet items on your slides to jog your memory and enable you to expand on the subject at hand. The environment
in which and the time at which you deliver your presentation plays a
big role in how you go about keeping the undivided attention of your
audience. Is it an early morning presentation? An after lunch presentation,
or an evening session? Is the audience fresh and ready to listen or
are they distracted, tired and ready to quit? You should be able and
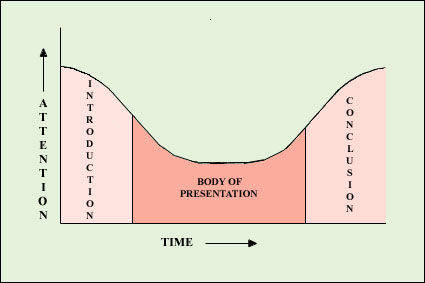
prepared to adapt and compensate accordingly. Researchers investigating
this issue have found that audience attention varies considerably during
a presentation. In general, attention is high at the beginning, but
tends to fall off after 10 to 15 minutes. Attention tends to rebound
again once a speaker indicates that he/she is nearing the end of his/her
talk and begins to present the conclusions. This tendency is expressed
graphically below. Figure 4: Graph showing the general level of audience attention during the different phases of a presentation. Since the level of audience attention tends to be at its lowest during the central portion of a presentation, it is important that you, the speaker, highlight or repeat key ideas for emphasis during this period of low attention span. This variation in attention span is amplified during long presentations, which exceed 20 to 30 minutes in length. A helpful hint is to use some clue to alert your audience and stimulate their attention, especially when you are getting ready to conclude your talk. 8.3 Answering Questions The greatest concern of most presenters is being asked a question and not knowing how to respond. There are an infinite number of questions that an audience can ask. Some questions may be good and appropriate, while some may be off the mark. Some may come at a good time and others at a bad time. You should keep in mind, however, that all questions are basically good because they reflect the level of understanding of your audience and in someway shed some light on how successful you have been in transmitting your message. In most formal settings, questions are held-up until the end of your talk. To prepare for the question-and-answer session, you should rehearse and practice answering several types of questions you think the audience may ask you. This can be done most effectively when the dress rehearsal is done in front of a knowledgeable mock audience. For example, I required that the dress rehearsal for important presentations be given in front of the entire research team that conducted the investigation. At the end of the practice session we had an extended question and answer session during which our entire research team was free to ask any imaginable question they could come up with. The mock audience was urged to play the role of devil's advocate. This role-playing enabled, and even forced, the presenter to come-up with coherent and satisfactory answers to all types of imaginable and conceivable questions. Since the research team was intimately familiar with the work being presented, hardly any line of questioning escaped notice or was left unexplored. Following these sessions, the presenter always felt very confident and well prepared to answer any types of questions that would come up at the end of the formal presentation. In actual fact, and from experience, having gone through this gauntlet the presenter hardly ever got a question from his audience that he/she was unprepared to answer. When someone asks a question and you answer it, remember to ask the questioner if your answer was responsive to his/her question. It is important to do so because many times presenters answer what they think was asked, whereas in actual fact the answer addressed a totally different aspect of the presentation from the perspective of the questioner. Also, do not give more than two answers per questioner in order to allow others to participate in the discussion process. Also, if you find yourself really stomped by a question, you can flatly say you don't know, but will find out the answer and get back to the questioner at a later time. Finally, since the question and answer session may digress from your message, it is helpful to wrap-up the discussion session by reminding your audience one more time of your key points and conclusions. 8.4 Time Awareness Presenters do not usually run out of material but they often run out of time. Unfortunately, many presenters tend to squeeze more into their allotted slot than they have time for. To avoid this trap, try to prepare for a somewhat shorter presentation, and resist the urge to go beyond your scheduled time. Audiences appreciate a person who is right on time, or even better a few minutes under, especially if there are other speakers to follow. If you are the last speaker, remember that you may be holding people who may want to leave. Do not race through the end of your presentation to stay on time. Remember that you do not have to finish and if you feel that you are going to run over your time limit, go directly to your wrap-up and conclusion section and skip all of the details that will eventually get you there. Your audience will be appreciative.
In this course you have learned which questions you need to answer in order to begin assembling the initial elements of your presentation. From that initial point, you have been prompted on how to go about preparing the first draft of your presentation, keeping in mind that information presented in a written document differs from information communicated during an oral presentation. You have learned how to organize your presentation into an introduction, a body or core message and a conclusion section. Once you have accomplished these fundamental steps, you have been urged to practice over and over until you feel very comfortable with the message you intend to impart. These repeated rehearsals are intended to free you during the event to concentrate on your audience and respond to their changing mood and attention span. To achieve this desirable result, you have been given pointers on how to prepare for the big event and how to comport yourself at the podium. Finally, the appendix presented below has given you guidelines on how to prepare clear, attractive and effective visual aids to support the presentation of your message. If you want to explore this topic further on your own you can find additional interesting material presented by the National Speakers Association on their web site at: http://www.nsaspeaker.com. You will also find that the following web sites contain useful and informative suggestions for follow-up at http://www.presentations.com and http://www.toastmasters.com. You may also want to check on the Internet the biography of the following scientists: Niels Bohr, Albert Einstein, Richard Feynman, Robert Oppenheimer, Rita Levi-Montalcini, and Linus Pauling; they were all successful presenters of technical information.
APPENDIX A A.0 Guidelines for Preparing Effective Visual Aids The visual aids you prepare should blend into your talk with the purpose of supporting your points and ideas in order to enable your audience to absorb both the oral and visual information you are presenting with ease and comfort. It goes without say that any poor visual aid will hinder this process and will affect your ability to convey your message with clarity. There are a few basic and common sense guidelines for the preparation of effective visual aids. In all cases your illustrations should be simple and clear, colorful and easy to read. Each illustration you prepare should be checked against these simple guidelines to ensure that it will capture the attention of your audience. A bad illustration is poorly designed, hard to read and cluttered with superfluous information. If these problems are present, your audience will quickly loose interest. Conversely, a well-designed visual aid is interesting, easy to read, pleasurable to look at and will hold the attention of your audience. These guidelines are discussed below. A.1 Simple and Clear Simplicity and clarity is the single most important principle. Often speakers will use, without modification, illustrations that are borrowed from a printed text. This is not a good idea because a drawing in a book, or a professional publication, is designed for the reader to look at and study for as long as is necessary for his/her comprehension. On the other hand, during your presentation you are the one who control the period of time your audience has to view the information you are presenting. Since each person in your audience reads at a different speed and has a different comprehension level the visual information you present must be simple and comprehensible to all at a glance. The audience should be listening to you as well as looking at the image on the screen. If your illustration is cluttered and filled with irrelevant information the audience will try to process and make sense of what they are looking at. If they are busy reading and figuring out what they are looking at, they will miss what you are saying. In summary, each of your visual aids should only illustrate the point you are making at the particular moment you are using that specific visual aid in your presentation. Prepare a sketch for each potential illustration. Use these sketches to find out what is being said as each illustration is shown. The next step is to look at each illustration again and see what can be omitted or how it could be simplified. If one sketch contains too much information break it down into a series of illustrations so that each sketch will contain only one point or idea. You can also simplify your preliminary sketch by omitting titles, labels and line work that is not essential to the central point that you are making. In summary, a good illustration is one that contains very few items. Ideally, only the one thing you are talking about at the moment you are using that specific illustration. A.2 Colorful Color helps
your audience grasp the various pieces of information you are presenting
quickly and efficiently. For example color can be used to show that
similar data or features on your figure are either grouped together
or represent different and contrasting items. Keep in mind that similar
and contrasting colors are easier to distinguish on a figure than black
and white textures and patterns. The following figure illustrates this
point. Figure
5: Color coding showing related items (a) and contrasting items (b). You can see that the differences shown by figures 6a and 6b are easier to grasp quickly and with less effort than the differences shown by figures 6c and 6d. You can use different shades of the same color, or a group of related colors to depict gradual or transitional changes (Figure 6a). On the other hand you can use sharply contrasting colors to show and emphasize sharp differences and separations (Figure 6b). Be aware, however, that an illustration that contains too many shades of the same color can be confusing. Also, once you have chosen a color scheme, try to stick with that scheme throughout your presentation. This is desirable to maintain continuity. In summary, color is used to highlight, clarify or contrast trends and features shown on your illustration. Color is also used to produce a visually pleasing and attractive image. A.3 Easy to Read A quick way to loose the attention of your audience is to show them an illustration that they cannot see or read easily. A rule of thumb is to use ten lines or less on any slide or transparency you project. In all cases use a large and legible lettering type that the audience can see from the back of the room without squinting. Keep in mind the viewing distance when you select letter sizes, letter styles, symbol shapes and line weights. While preparing an illustration remember that you are looking at it close range, and it may seem very clear and easy to read to you. To check for appropriate clarity you should view your drawing from about six feet away. If the line weights and the boldness of the characters you have chosen look pleasing and are easily readable from that distance you would have selected an appropriate size and boldness for the components of your image when it is projected on a screen. In preparing
the final version of your visual aids, make sure that they will project
as big as possible on the screen. Reposition labels, scales and descriptive
information so as to use the available space fully. For example, place
labels inside the drawing when possible and make use of all open areas
around the drawing without leaving too many blank spaces. Figure 6: Inefficient use of available space (a) as compared to a more efficient use of available space (b) Also, project the image horizontally so that the longest dimension lies parallel to the floor and ceiling. This is desirable because in many cases a low ceiling or the heads of people in the audience will often block the vertical dimension. In addition, designing the image to project horizontally will allow it to use the entire width of the screen without being clipped in the vertical direction. Remember
that your audience will be seated at various distances from the projection
screen. The rule that is generally followed by architects and audiovisual
specialists when constructing conference rooms relates the width of
the projection screen to the length of the room. They have established
a standard of 6W/2W as an image size most acceptable for quick scanning
by an audience. Under this standard, the last row of viewers should
not be further than six image widths from the screen, and the front
row of viewers should be no closer than two image widths. The following
figure illustrates this relationship. Figure 7: Illustration of the standard used by architects and audiovisual specialists when constructing conference rooms (modified from a figure published by Calvin R. Gould in 1972, by Bill Communications, Inc.) If
you use this guideline, the figure you prepare should be clearly visible
and most importantly easily legible. Once you have decided on an appropriate
dimension to use for one of your figures keep it constant for all of
your illustrations to ensure uniformity throughout your presentation.
If you find that you have to depart significantly from these proportions
for one of your drawings it is a sure sign that this particular drawing
needs to be simplified or subdivided into separate illustrations. In
summary, your slide should be designed so that all lines, symbols, words,
numbers and other markings that are shown are clearly visible not only
to the people sitting in the front row, but to those in the back of
the room as well. It is interesting to note that typical portable screens
used in hotels are 70 inches wide (5.8 ft.) and most hotel conference
rooms are 30 to 40 feet long which permits the application of the 6W/2W
rule. Therefore, if as a presenter you follow the 6W/2W rule in the
production of your visual aids and prepare all figures in a horizontal
format, legibility can be assured.
Preparing and Delivering Technical Presentations in PDF Format (283 KB). Quiz Once you finish studying the above course content, you need to take a quiz to obtain the PDH credits.
DISCLAIMER: The materials contained in the online course are not intended as a representation or warranty on the part of PDH Center or any other person/organization named herein. The materials are for general information only. They are not a substitute for competent professional advice. Application of this information to a specific project should be reviewed by a registered architect and/or professional engineer/surveyor. Anyone making use of the information set forth herein does so at their own risk and assumes any and all resulting liability arising therefrom.
|